Friday, August 12, 2011

The Aliens have landed!!!!!

Just a fun little card to get you through a quiet Friday night!!!!!!!! I made this with  my class a few weeks ago and had a blast doing it. The little alien spins around on two 5 cent coins.................cute................

Have a great Friday night everyone..................I am off to clean the studio................and the question is ..........will I ever surface again!!!!!!!!!!

Monday, August 8, 2011

Desk Top Holder Tutorial

I originally made this desktop caddy a few years ago. I saw a photo of it online and worked out the measurements etc. After a few attempts this what I came up with. I used it to give gifts for teachers, friends etc. Its fab if you fill it with pampering products peaking out of each section. It can be used as an Easter Basket. or just as the name suggests you could use it as a desk top caddy. There are just loads of things you could fill it with. Right lets get started.

All measurements are in inches.

Take a 12 x 12 sheet of card make a mark at 4" and 8" an one edge, turn and make marks on the next edge at 4" and 8". Score from these marks across the card and you will end up with 9 boxes. (sorry photo is a bit dark)

Cut 8 squares of patterned paper to fit in the boxes you have just scored. Cut them slightly smaller than the 4" square you are gluing them into as you want a nice small boarder around the paper and you don't want the paper buckling when you fold it all up together.
Glue all 8 pieces to the outside squares. The middle square is actually the bottom of your holder so this does not need to be covered. Ensure the 4 corner pieces are very securely glued as you are about to score them and you don't want your paper to buckle. I tend to use double sided tape all around the edges and glue stick for the center of the patterned pieces. Fold all your straight lines back into mountain folds (away from the center box)

Score the 4 corner boxes diagonally from corner to corner. The center box remains unscored. . Then take each individual corner and gently fold into valley folds (patterned paper will fold inwards towards itself) 

On each corner punch a hole as shown below. Ensure this hole is punched on the score line.
Now for the ribbon. I normally keep the ribbon on the roll as when you pull the edges together you actually end up using a very small amount of ribbon .Turn your project over to the uncovered side and place ribbon through two diagonal holes as shown in the photograph.
 
Pull the two ends of the ribbon together and tie in a neat knot, leave little tails and cut at an angle to pretty it up!. Be careful not to crush the two points of the card. 
 Now take a second piece of ribbon and bring it through the next two holes. This piece of ribbon should be brought underneath the ribbon already tied.
 Pull the two end of ribbon together and tie in a knot. When you do this you will capture the first piece of ribbon in the middle. (this will all make complete sense when you are making the project...... I promise!)


Done and dusted.


Sunday, August 7, 2011

Surprise Box Tutorial


Box Bottom:
(all measurements are in inches)
From an A4 piece of card cut a square 7½" x 7½" 
Score at 2½"  and 5" along one edge.
Turn and do the same on a second edge
You will be left with 9 boxes scored onto your piece of card (sorry, photo is a bit dark)

In the four corner boxes only score diagonally from the outside point to the inner point.
Now fold all your straight scores inwards Strengthen all these folds with a bone folder, this is essential to do as it helps the box to sit nicely under the lid. With the diagonal folds in the corner boxes fold these inwards carefully one at a time to ensure you don't crease across the central box.

This is how your box will look now:
Place a corner of the box into your guillotine or trimmer and from one score edge to another cut off the top piece. I do this by lining up the two points either side of the box onto my cut line on the guillotine and then cut it off.
  Your box will now look like this.
 Fold box inwards, this is what it will look like before decoration.

Box Lid
(all measurements are in inches)

You will have a section left from the A4 piece of card that you cut the box from earlier.
Cut a square of  4.2" x 4.2" card from this left over section.
Score at ¾ " on each side (from the edge). You will make 4 score marks in total and this will leave you with a square scored in the center of your original square.

Cut on the lines as shown in the picture below. Cut a slight angle into the flap cuts so that they fold into the box lid neatly. Add double sided tape to the flaps
Decorate the box top. (not the 4 flaps)
Fold flaps inside the lid to secure.

 DECORATION
Open up your box to decorate.

On the decorating front….. In my box at the top of the tutorial I used the Birthday Papers and Birthday cardstock stickers and some of the Tulip Toppers (all from Docrafts). 

(Apologies for the 2 fuzzy photos below, but the camera is in the car and it is pouring rain so I just took sections from a larger photo and sectioned out the pieces need so I can show you! Scared of a little bit of rain........... YES.......... it is Ireland after all!!)

Working on the Inside of the box first. Measure one of the squares in the box (they squares are all the same size) and then cut 6 squares slightly smaller than this size so when you place them in the square section they will have a slight boarder around them. I just find this to be a neat look and means the paper won’t crease when the box folds inwards. Four of the squares will go in the full square panels. (If you are decorating the central panel with papers then cut 1 extra square for this).
The other two squares that are left over you cut to fit into the four corners that fold into the box.
To do this take a square and cut it diagonally from corner to corner. Then take 1 corner piece you have just cut and split it in half down the center from the point to the bottom, this will give you the 2 pieces for one corner section. Now do this with the second corner piece and glue into the second corner. Cut the second square in the same way to get another 4 pieces to place in the remaining two corners of the box. 

If these directions confuse anyone, then just give me a shout out in the comments section about it and I will photograph the process for you and put it into the tutorial later.
Next thing to do is decorate the outside of the box in the same manner. When you are finished your masterpiece pop your lid on and your done and dusted.


Friday, August 5, 2011

Handmade Pencil Toppers

Well I woke up this morning and felt so much better it was amazing, so in the spirt of feeling well and giddy before tomorrows demo I thought I would pop up a little tutorial for you all.

I just love little handmade toppers and whist researching a couple of months ago I came across these cute little pencils. I have searched everywhere since and I just can't find the original link so I thought I would do up a little tutorial for you all to follow. If you have been at my demos lately you may have seen me do this but its always good to have a reminder!

The card itself was made using Docrafts Kraft Cardstock (love that stuff). I used the Tim Holts letters for Teacher and some older Quickutz letters for the A+. The stamp is one that my big sis Janice brought me back from the states and the black is just a smooth black cardstock that I had hanging around.


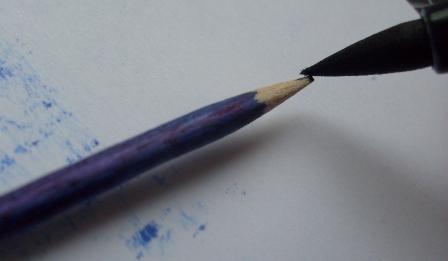
Pencil closeup.

 
Take a BBQ stick and place it on spare card as when the marker is wet it will leave marks behind.
Color the top part of the BBQ stick with a permanent marker leaving the tip untouched.
Color just the very tip of the BBQ stick with a dark grey marker, leaving a gap between  the tip and the main body of the pencil.
Ta Da........... it already looks like a pencil.
Now to complete the job. Decide on the size of the pencil and cut off the excess with a wire cutters (not scissors as these would be blunted).
 Color the end of the pencil with your marker. Leave to dry completely before you try to put this on your card so you don't damage your masterpiece!
 Voila, your pencil is complete.
 I use very strong double sided tape, silcone glue or a glue gun to stick the pencils in place.

This card below was made using Kraft Cardstock and the Pampered Pets cardstock letters from Docrafts, some smooth black card and just the apple from the stamp used above. The pencils on this small card were made with cocktail sticks.
Well go on now, give it a go. You will get very excited when you make your first one, just don't do what I did and make about 30 of them because I was so thrilled with them. They are hanging around all over the place now!!!

Thursday, August 4, 2011

Happy Birthday Surprise Half Slide Card


Can you tell I make up these card names as I go along!!!!

Sorry everyone for the delay in updating the blog, but I have been a sick little puppy for about a week or so now. I am demonstrating in the Art and Hobby in Jervis Street in Dublin this Saturday and am hoping that nobody notices the odd hacking cough, cold sweats etc etc. LOL.

This card is one from my latest demos using the Do Crafts Happy Birthday range. The cake on the front panel is the Birthday Cake Die Cut for the Big Shot, its cute and quirky, my kind of cake!!!!.I love these type of cards as they are so easy to make and just a little bit different from your run of the mill card. I will pop a tutorial up at some stage to show you how easy it is.

Well its back off to the sick bed for me now, time to take lots of syrups, tablets etc etc so I can at least speak at the demo on Saturday.

Take care all.............

Monday, July 25, 2011

Tatty Teddy Spinner Card


What is it about spinning cards, moving cards etc that I love so much, honestly I don't know I just LOVE THEM. If I could make a card that could sing and dance I think I would be in heaven!! This is a card from last months demos showing off the Do Crafts Tatty Teddy decoupage and papers. Not much of a bear person myself but this little guy has proved to be the exception to my rule. Cute.......

Friday, July 15, 2011

Cardmaking Summer Challenge................. if you dare!!!!!!!!!!!!

 I would love to see what you can come up with from this tutorial. I have given no finished sample for you to bounce off. I just want you to work from your own crafting inspiration. This is a general tutorial with no step by step pictures just a couple of tables showing scoring and cutting to keep you on the right track.

Take a good photo of your sample and email it to me at cliona_larkin@yahoo.co.uk and I will put all samples up on my blog for everyone to see. All entrants names will go in a hat and a winner will be picked out (by an independent non card making person) to win a little goodie pack that I will put together. This is not a competition, it is a challenge so the winner will be a random pick and most of all it is for FUN…………. You have until the 31st of August so take your time and enjoy making it. This Challenge is open to everyone from beginners all the way up to designers, its not about how amazing your projects might be but its all about giving it a go and taking up the challenge.

CUBE GIFT BOX


Trim a sheet of A4 card to 21cm x 28.4cm.
Score down the long part of your card from top to bottom at 7cm and 14cm.
Score down the short part of your card at 3.7cm, 10.7cm, 17.7cm, 24.7cm.
The next scores will be in the top and bottom sections of the card only. Score at 5.7cm and 22.7cm.


Cut the last scores that you made in the top and bottom rows and then cut either side of them (see below image),
Cut marks are indicated in thick dark lines.


On the short tabs, cut at a slight angle, this step helps the box to close with all the layers of the card.

Use the middle folds to create a box, with the end pieces as half a box each.

Place sticky tape/glue on small flaps for the half box lids and the flaps beside them to help the internal box stayed closed (this little gem I want you to work out yourself…….come on you can do it…..you know you can….)

Here are a couple of photos to give you an idea of what your project should look like (before it is decorated). The first picture shows how your box will look just before you tape it together to make the internal box.
 This is how your box will look completed before you decorate it.
Enjoy and remember it’s just for fun…………