Showing posts with label Tutorals. Show all posts

Sunday, December 18, 2011

Hidden Panel Card Tutorial


Well how did we suddenly get to Day 7 of Tutorial Week. I can't believe a week is already up. I have had great fun doing this and I have been so excited every day to see any comments you have left.

For my final tutorial of the week I am going to show you a Hidden Panel Card. These are great because you can use all of your flat embellishment inside. We tend to get very focused on making items 3D and making them pop off the card so this is a nice card where you have a ready made excuse just to keep it as flat as possible!!!! You can do so much more with these cards than I have shown. I just wanted to keep the cards very simple just to give you the idea of what it can look like.

I love when people open this card and think that maybe you haven't stuck it together properly and then they discover that it is actually a hidden panel inside. lol. I have even had people say "Oh Cliona its coming apart" and then realized that its part of the card. They love it.

I have made this card in A4 but you can actually make it in any size you want. Just take your piece of card and follow all the instructions below and you will produce the same results no matter what size you use.

Right here we go:

Take an A4 sheet of card

Fold this in half (Oops.... forgot to take this picture and the batteries are flat in the camera). But seriously just fold it in half....  :)

Now take the top piece of the folded card and fold it in half back to to the spine

 
Turn the card over and fold back the second half sheet to the spine
Your card should now look like this.
Your card spine is now in the middle of the card.(see photo)
Place that middle section (center spine) up against your craft board or ruler and measure it into 3 separate sections. My board is in centimeters and the card measures 21cm. So I make a mark at 7cm and 14cm.
Cut from these two marks (on the spine) to the center crease.
Measure the panel shown below.

Cut two strips of coloured card to the same size of this panel. You are going to be fitting these into the card. My preference is to cut them to the same size as the panel and then if they don't fit in neatly  - (they could cause slight buckling when you close the card) then you can cut a small sliver off the panel and try again. You want these panels to fit neatly. (not so tight as to buckle the card and not so loose that they slip out of the card). It is worth taking your time with this so you don't have to start cutting them again from scratch.

Open up the card.


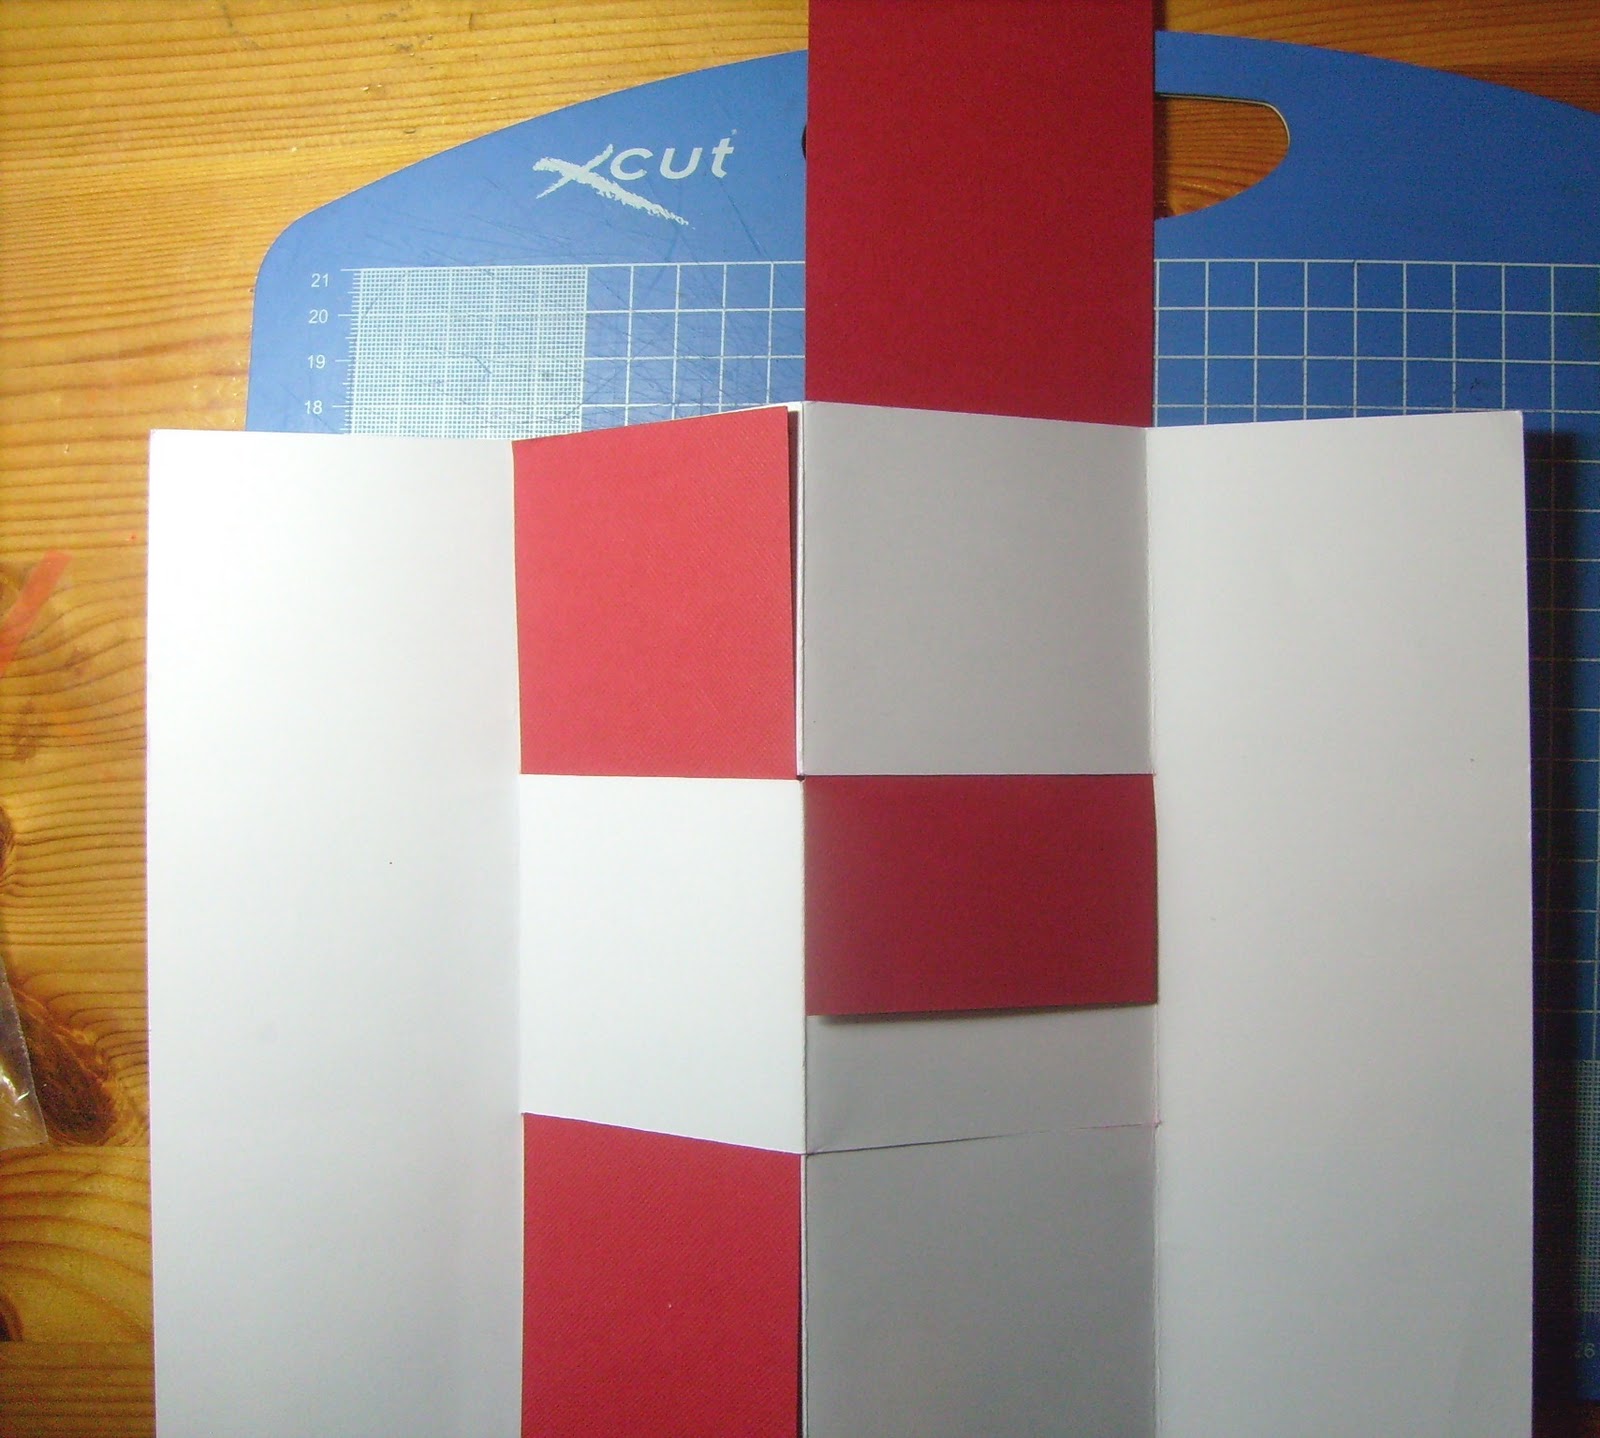
Take one of the panels and starting on the left section put the panel through the top cut down the back and out again through the bottom cut.

 Now with the left section pop the card through the cut from behind down the front of the card and through the second cut. This can be quite tight and awkward but take your time and it will fit neatly.This all makes sense to me but I am sure I am making it very confusing!!! Hence all the photos to show you!!!

 You have now made your hidden panel card.

Where is the hidden panel you ask! In the middle section pull the sections apart. They will be quite tight to start with and the more you play with this card the easier it is to open and in fact it becomes quite obvious to the recipient that there is an extra panel.


This is the hidden panel when it is open.
Now pull on the white side panels and the centre panel will pop back togeather and leave the card as shown below.


Saturday, December 17, 2011

Christmas Ornament / Tag Tutorial


Well here we are Day 6 already. I love this ornament and have been showing it at all my demos for the last 2 months. Once you have made one you will be hooked as they are so easy to put together. I thiink these would be georgous as tags on your presents with the persons name on the front so you are giving a personalised ornament as well as your gift.

Right here we go...

All measurements are in inches

Cut 5 pieces of card to 3" x 3"
On both the back and the front of these 5 pieces stamp your image. I have used the poinsettia from Papermania "At Christmas Time" stamp set. Any stamp with good fine detail will work really well.
Sponge each piece on the back and front .(See A6 Calender Tutorial for sponging tips.)

Ink around the edges by running your pieces along your ink pads. This will give a nice definition to the edges.
Now for the folds. Work on one square at a time. All the folds are the same for each square.

Fold the square from edge to edge.
Open up and fold edge to edge in the opposite direction you will end up with a cross on the square.
 
Place your piece of card on the table and flip it over  (turn over and work on the other side) you are now to fold from corner to corner. This fold is very important for making the square pop into position.
Open up your fold and put your finger underneath at the center and push to pop it upwards. Your square should now look like this. Push in the right and left squares with the creases in them together (pointing downwards. Push them towards each other until a full square forms.
Your square should now look like this.
 
Do this to all five squares.
 Now see the way they open up. You are to join all of these togeather with the open section all facing the same way when joining them. (see photos).
 
Cut two pieces of card 1½” x 1½”. These are your covers for the ornament.
Decorate these covers. I stamped mine and sponged them to match the inside panels.
Close up your ornament and place some double sided tape from the back corner to the open corner, remove backing tape and lay a long piece of ribbon over this. Do this on both sides of the ornament.
Place your decorated cover over the ribbon. Make sure you think about what way the ornament will hang when unopened as you don't want the words going off at a dodgy angle!!! 
Now you are ready to attach the bead. We have a fantastic beading shop in Bray town called BDI and they have an amazing variety of beads and findings and of course the most important thing.... a fantastic Coffee Shop :). This silver bead is my absolute favorite for this ornament it just adds a touch of class to it. I make my ribbon a lot longer than I need it so I can cut it to a sharp point to get it through the width of the bead.  Push the bead all the way down the ribbon to the top of the ornament.


Tie a knot at the top of the ribbon and cut it neatly to tidy it up. If you find your ribbon is fraying at the top you can VERY CAREFULLY run a flame along it and it will seal the ribbon to stop it fraying. You need to be quick doing this as you don't want to bun the ribbon or yourself. Another solution is to use clear nail polish but to be honest a lot of times I find this soaks down slightly into the ribbon and ruins the look of the project.

Your Ornament is done. Here it is closed.

To open it, slide the bead up the ribbon to the knot at the top. Turn the ornament inside out (bring both covers around to meet one another). Slide the bead back down. Your ornament is now open for display.

Below are a couple of other options. You can make this ornament with any shape that will fold exactly edge to edge in all directions for example circles and you can make it any size you want so long as it is the exact same size for all five pieces of card.

This shape is cut from the Xcut Four Petal Nesting Dies.
You can use any colors. The one below is inked in black using an "Ink it Up! dye based ink.
You can use any stamp you want  I like to use fine detail stamps. The stamp used below is the Enchanted Christmas Holly Fairy from Docrafts.
I hope you all enjoy making this cute little thing.

Happy Crafting everyone.