This is one of my favorite Christmas cards to make. Last year I made the trees with just three squares and this year I made it with five. Its quick and easy once you get the hang of it. I am going to take you through the card from start to finish as there are a couple of quick tricks in putting it togeather to get this look.
Right, lets get going.
Fold a piece of A4 card in half to make your card.
Cut a piece of patterned paper smaller than the card so you are left with a nice boarder all the way around.
Take a circle punch and out of some scrap card punch out a corner as shown below. I used a 1.5" punch from Xcut. It may take a few attempts to get a corner you like the look of but once you do you should keep it as a template for future cards.
Place this corner on the back of the patterned paper you cut for the front of your card. Place it right up to each corner and draw around it.
Now go back in with your circle punch and punch out these corners. This method will ensure that you have nice even corners on your patterned paper. Keep the corners you have cut off, you will need them later.
Now cut out a piece of white card to match exactly the size of your patterned paper.
Adhere the patterned paper to the white card.
Attach this piece to the front of your card.
Now to make your tree.
Cut out 5 squares. I will give you the sizes I used for this card here but you will see it is just a case of dropping down by 10cm or 1/2 inch for each square.
Cut 5 squares: (1) 10cm x 10cm (2) 9cm x 9cm (3) 8cm x 8cm (4) 7cm x 7cm (5) 6cm x 6cm
(If you are using the XCut Guilloteen cut at 100 x 100, 90 x 90, 80 x 80, 70 x 70, 60 x 60 (cm))
(If you are measuring in inches. 4 x 4, 3.5 x 3.5, 3 x 3, 2.5 x 2.5, 2 x 2 (inches))
Take your biggest square and fold from corner to corner with the patterned facing upwards.
Open it up and fold from corner to corner in the opposite direction with the pattern facing upwards.
Open your paper up, it will now have a cross in the middle.
Turn the paper over so the white side is facing downwards and fold the paper once from side to side so that the paper in facing inwards.
When you open this up if you push up the center from the white side it should pop into this position below leaving you with two of the folds facing down.
Push the two full triangles togeather
Lay this down on your board and you are now only going to work with the top triangle. The bottom triangle will stay intact. Taking one side of the top triangle fold it over to create a crease mark. Now put it back in place so that the full triangle is facing you again.
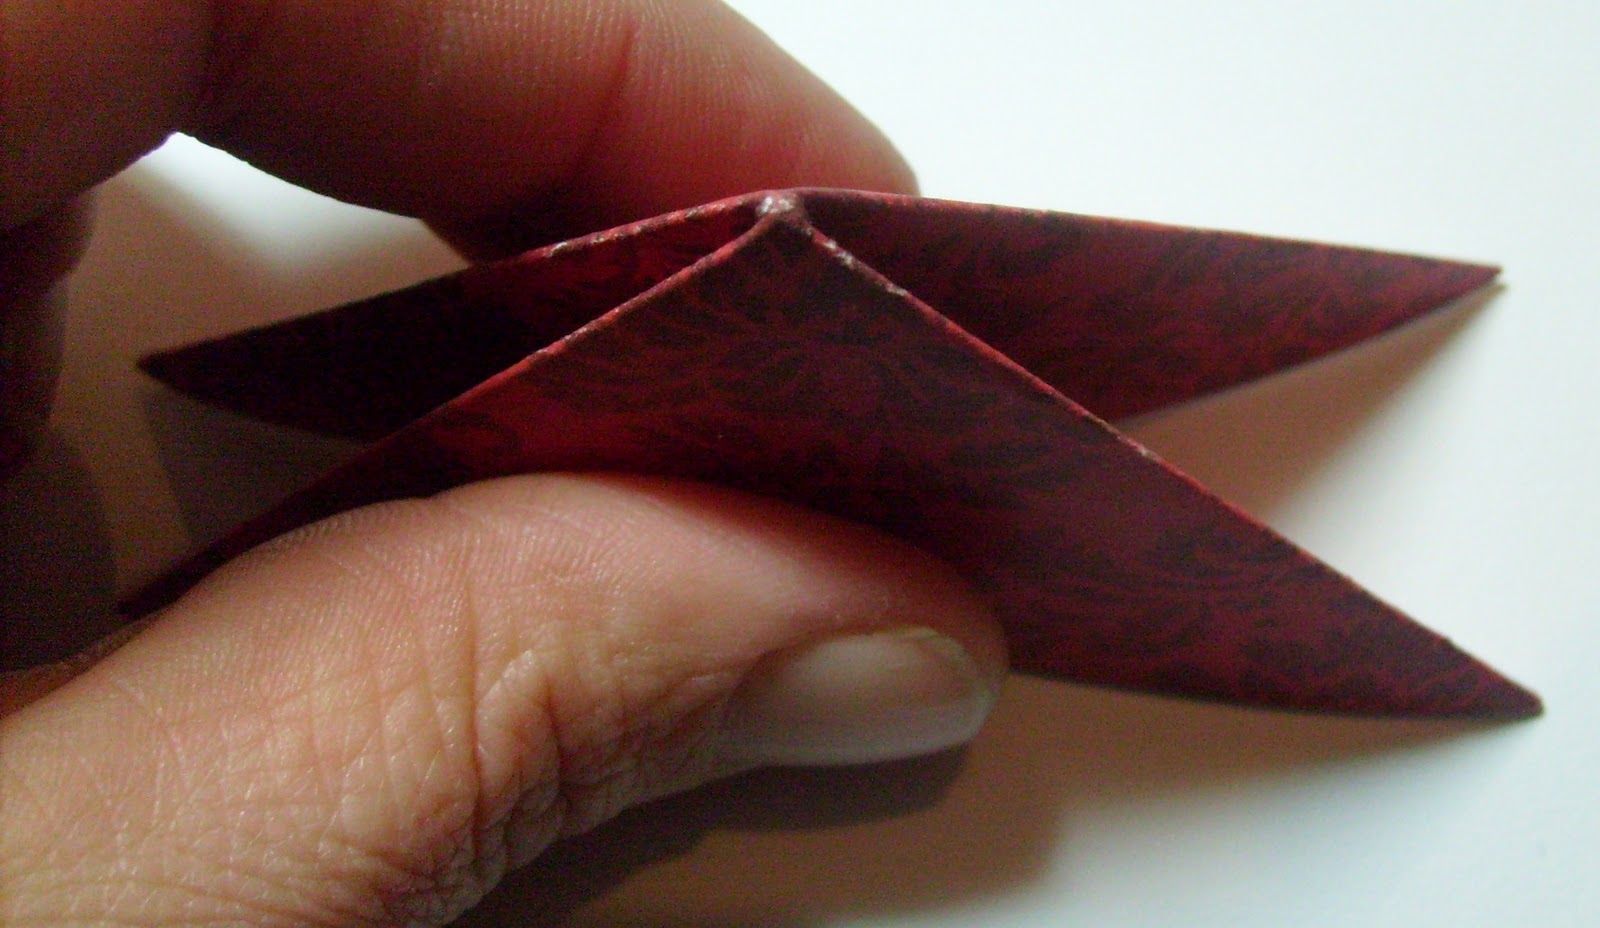
Now with your left had put your finger nail right to the top point (this stops the paper from tearing) and with your right hand grab hold of the right bottom point of the top triangle. Pull that point downwards so that the edge of this secdtion of the triangle is butted up to the centre fold you have made. You can't actually see me do this in the photo as I needed one had to actually take the picture. lol.
Now do the same to the left side of the top triangle. It should now look like this:
Repeat this process for the 4 remaining squares. With all the photos it looks very time consuming but once you get the hang of it you will wiz through them. Lay your 5 triangles out in a row. largest at the bottom and smallest at the top, this is the way your tree will go together (from large to small)
Taking the four largest triangles, turn them over and place a small section of double sided tape at the top point. Don't use strong tape for this as you want to have the freedom to move these pieces around so you can get them straight.
Take the largest triangle and take off the backing on the tape and slip it inside the pocket of the next triangle (the next size up). Play around with it until you get it looking nice and straight. I mostly use the lines on my craft mat to help me get it straight. Don't push it all the way up into the pocket, stick it only about half way down the inside of the triangle. See the photo below.
Now do this for all the other triangles - largest getting stuck into smallest until your tree is built.
Turn your tree over and put a strip of double sided tape down the back of it. This will stop the triangles moving about and it also means that if you decide to make a few of these then you can just make them all at once and stick them in a box until you have your cards ready to go.
Now cut out whatever you are going to mount this tree on. I used the Xcut Oval Scallop die.
Take the backing off the double sided tape on your tree and mount it onto the scallop oval. Drop it down slightly so you have room for a brad or decoration to put on the top of the tree.
Pierce a hole just above the tip of the tree and place your brad in. Don't go through the tree as it is just to many layers and it will leave the decoration sitting sideways. You want to cover the tip but not have it distort the look of the decoration.
You can now attach this to the front of your card. I use double sided tape as I want to ensure it stays secure (ohhh, I do love my double sided tape!!).
Time to work on the inside of your card.
Cut a piece of white card to fit inside your card, leaving a nice boarder around it.
Take your 4 patterned paper corners that you put aside earlier and glue them into the corners of this white card.This will mirror your design on the front of the card and has the benefit of wasting nothing!! I always do this before I stick the white card in as if any thing looks a bit dodgy its a lot easier to fix!
Before you attach this to your card sit it up against the card itself. If your corners are not right to the edge of the white card you will see some white showing and oh boy will this irritate you. If this is the case just tidy it up (lob off the offending bits!). Once you are completely happy with it attach it to the card.
Happy days, your card is done and dusted.
The photo below shows a little pizza box I made last Christmas with a class that uses a three square tree as a little topper.
I really hope you enjoy making these as much as I do, just don't do what I did at the beginning and make 50 million of them because I got so excited. Slight fairytale..........but dear lord I made loads of cards with them that year!!!


This is lovely. I'm going to have a go. Thanks for the tutorial :-) Alison59
ReplyDeleteHi Cliona. I am new to your blog and found it through a friend who used this technique on a layout she did and I loved it. I am so going to use this. I come to Ireland every year as my brother and his family live in Kilkenny which is not far from you. On my next trip I hope to be able to attend one of your classes. Great blog.
ReplyDeleteHi Cliona I have saved your blog for a long time and have used it and it has proved popular. Many thanks KT 2025!
ReplyDelete