Friday, January 13, 2012

Jazz up your A6 Cards

Well I have been so busy for the last 10 days or so that I haven't managed to upload anything onto the blog. I thought I would show you some of my cards that were in the last "Creativity Magazine" Issue 30 from Docrafts. They are made by using the  Papermania 52 All Occasion Card Kit. When you get a Box kit to work with you find that all the cards are the same size( in this case they were all A6 in size), you have a set kind of paper and embellishments etc. I sometimes love the challenge of making these cards just look different. So this is what I came up with.

This is an A6 card with just 2 small  panels cut out of the front. The greeting keeps the panels together and steady.

This is 2 A6 cards joined together in the same way the A6 Calender was made (see tutorial link on the side panel).

Front View
Side View
Back view (for message/greeting)

Again an A6 Card with deep top corners cut off.

A6 Card with a section cut out of the middle. Twirler is held on with thin jewellery wire. I scored about 1cm from the spine of the card on just the front panel and then stuck this section  together with double sided tape (to the back panel) whilst catching the jewellery wire to hold it steady. (confusing!!!!)
A6 Card. Take front panel and fold it in half  back on itself to meet the spine of the card. Now just decorate. I used a Tulip topper from a previous demo to be the main accent to the card.
A6 Card with simple tags and flowers.Just round off the corners.

A6 Card: The flower is the main part of this card. Just dressed up with some paper piercing.

With this A6 card I scored from corner to corner - left to right and then right to left at an angle with even spacing to create the crossed design on the front of this A6 card and then just dressed it up with flowers and a greeting.
 
Take your A6 card and follow the instructions on the Docrafts Tutorial here - Handbag Card Tutoral 
Well hopefully you like the projects above and they will give you a little bit of inspiration on how to jazz up your A6 cards in future.

Happy Crafting everyone.

Friday, December 30, 2011

Gift Pocket Card with mini hinges


This is a card I made last year. I love this card as it goes outside of using just card making materials. One morning I was looking at all the hundreds of brads that I had collected over the years, the sizes go from teeny tiny to big monster brads and I realized I never use them enough. So for days I was trying to think up a way of using them in a slightly different manner then I normally would.  I was wandering around Woodies DIY store and I saw these super cute mini hinges. Lord knows what they are usually used for but they just screamed mini card door to me whilst using my mini brads to hold the hinges on.....Eureka.

You know when you have these fab ideas and you think you are an amazing genius well that is the time that you look around and realise other people have had these ideas as well ........... how sad.....lol. Any how I was a complete genius for those few moments in Woodies!!!!

I made the sections of this card separately and then attached them to the front of the card. The door is kept closed with the little photo holder at the bottom right.  The background of the card was made by stamping one image again and again in a slightly darker green ink then the green card color.  The Hugs and Kisses pocket is joined flat to the card with double sided tape around the edges so that a gift card or cash can be placed inside. My ribbon in a bit frayed in this photo so obviously I will tidy that up before sending off the card to anyone (if I can stand to part with it!). The stamps are from Whiff of Joy and I used the masking technique to get the girl sitting on the mushroom and then colored in Copics and glittered up the wings.

Hope you like it..........happy crafting everyone.

Saturday, December 24, 2011

Big Buckle Christmas Card

Well I have been insanely running around trying to get ready for Santa's arrival and this is the first time in 2 days that I have managed to get a few minutes to sit down and upload a card. I hope you all have a wonderful Christmas Day and once the food has all settled I will make my way back to the world of blog!!

I will leave you with one final card.


MERRY CHRISTMAS

Wednesday, December 21, 2011

The meaning of Christimas

Just a few simple cards for you tonight. I am beginning my "Run around like a headless chicken" mode. Ah the fun of Christmas!!!!

I went to my daughters school Christmas play today in our local church. Hannah had a 2 line solo (yep I cried with pride - I'm a bit of a crier!!!). It was beautiful just sitting in the church and listening to all these gorgeous  kids sing and act their little hearts out so I thought the cards of the day should be appropriate to the peace I felt today :)

 
Happy crafting everyone.

Tuesday, December 20, 2011

Tatty Teddy Trio

Well only 5 sleeps to go..............We are so excited here about Christmas. We love to celebrate and it all starts tomorrow with Hannah's Christmas Play in School. She has a two line solo and you will not see a prouder mother then me!!! (I cried last time!!) lol.

The card for today is one of my favorite Christmas stamps this year. The card just seems to make itself when I work with this little teddy. The strips behind are self adhesive strips from the Tatty Teddy Cardstock range.

Hope you like it :)

Happy Crafting everyone.

Sunday, December 18, 2011

Hidden Panel Card Tutorial


Well how did we suddenly get to Day 7 of Tutorial Week. I can't believe a week is already up. I have had great fun doing this and I have been so excited every day to see any comments you have left.

For my final tutorial of the week I am going to show you a Hidden Panel Card. These are great because you can use all of your flat embellishment inside. We tend to get very focused on making items 3D and making them pop off the card so this is a nice card where you have a ready made excuse just to keep it as flat as possible!!!! You can do so much more with these cards than I have shown. I just wanted to keep the cards very simple just to give you the idea of what it can look like.

I love when people open this card and think that maybe you haven't stuck it together properly and then they discover that it is actually a hidden panel inside. lol. I have even had people say "Oh Cliona its coming apart" and then realized that its part of the card. They love it.

I have made this card in A4 but you can actually make it in any size you want. Just take your piece of card and follow all the instructions below and you will produce the same results no matter what size you use.

Right here we go:

Take an A4 sheet of card

Fold this in half (Oops.... forgot to take this picture and the batteries are flat in the camera). But seriously just fold it in half....  :)

Now take the top piece of the folded card and fold it in half back to to the spine

 
Turn the card over and fold back the second half sheet to the spine
Your card should now look like this.
Your card spine is now in the middle of the card.(see photo)
Place that middle section (center spine) up against your craft board or ruler and measure it into 3 separate sections. My board is in centimeters and the card measures 21cm. So I make a mark at 7cm and 14cm.
Cut from these two marks (on the spine) to the center crease.
Measure the panel shown below.

Cut two strips of coloured card to the same size of this panel. You are going to be fitting these into the card. My preference is to cut them to the same size as the panel and then if they don't fit in neatly  - (they could cause slight buckling when you close the card) then you can cut a small sliver off the panel and try again. You want these panels to fit neatly. (not so tight as to buckle the card and not so loose that they slip out of the card). It is worth taking your time with this so you don't have to start cutting them again from scratch.

Open up the card.


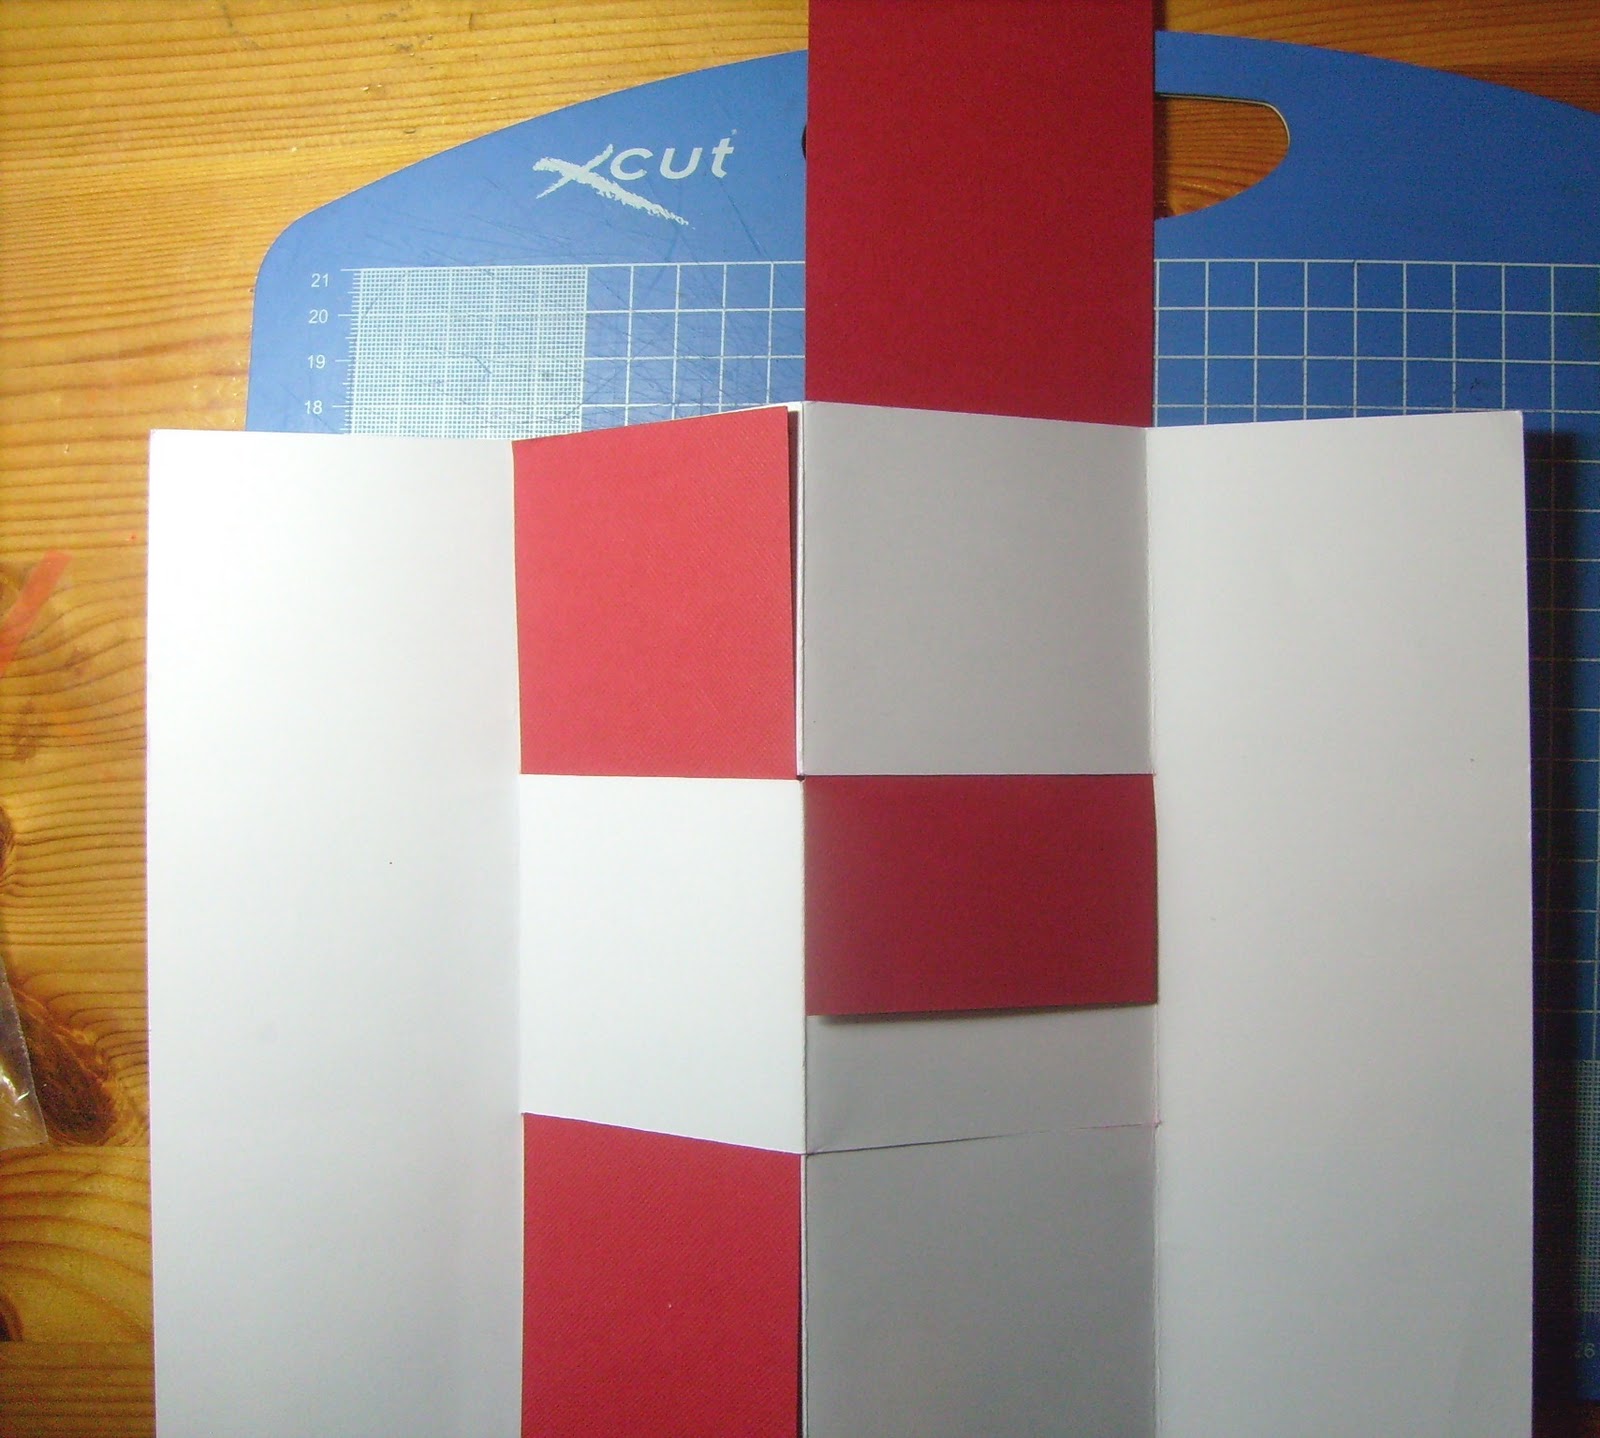
Take one of the panels and starting on the left section put the panel through the top cut down the back and out again through the bottom cut.

 Now with the left section pop the card through the cut from behind down the front of the card and through the second cut. This can be quite tight and awkward but take your time and it will fit neatly.This all makes sense to me but I am sure I am making it very confusing!!! Hence all the photos to show you!!!

 You have now made your hidden panel card.

Where is the hidden panel you ask! In the middle section pull the sections apart. They will be quite tight to start with and the more you play with this card the easier it is to open and in fact it becomes quite obvious to the recipient that there is an extra panel.


This is the hidden panel when it is open.
Now pull on the white side panels and the centre panel will pop back togeather and leave the card as shown below.