Wednesday, August 22, 2012

Tatty Teddy is Missing You

Just a quick card post today, Its been a busy week. Hannah is starting Secondary school in the next couple of weeks. She had her Induction day on Monday and now its the final run around time to get school shoes, calculators etc etc etc.......... and the list goes on!!!

Its also the week that the new Decrafts stock arrives so its frantic idea focus week to try to be ready to jump head first into new creations. All the Docrafts Designers are out there now with their brains working away on new ideas so it will be a busy few weeks for us all. I have two more demos this weekend in Newbridge Art and Hobby and Dundrum Art and Hobby showing the latest stock and then off I go on everything NEW NEW NEW. Yahoo.

So today I thought I would show you a quick and simple card using the Papermania Checkmates Embossing Folder and a Tatty Teddy Element Topper.

Nothing like an easy card to start your day :)
Happy Crafting Everyone :)

Monday, August 20, 2012

Pretty Wardrobe Card

Hi Everyone, today is the day that I felt like having a little bit of pretty on the blog. I made this card for demo and it got a great reaction from everyone, I have to say that its one I really really like.. The sides of the card have been scored at about 1/4 inch to add some height so the decoupage wouldn't get squished (hehehe... love that word!)

This card uses the decoupage, papers and a greeting from the fantastic Lucy Cromwell Ultimate pack, some bright pink card, 2 brads and voila a pretty card is born :)

 
Happy Crafting Everyone...... :)

Monday, August 13, 2012

Graduation Card Tutorial

I kept seeing Graduation cards all over the internet and for some reason no matter how hard I looked I couldn't find a tutorial on how to make one so .............I made it up myself........giggle. Its super easy to make and really gets a wow from the receiver. It can be done in white for weddings. Just embossed with the simple words of Wedding Invitation and it really is beautiful.  I have actually made this tutorial in white as I thought it would be easier for you to see in the photos.
So lets get going on making one :) All measurements are in inches.

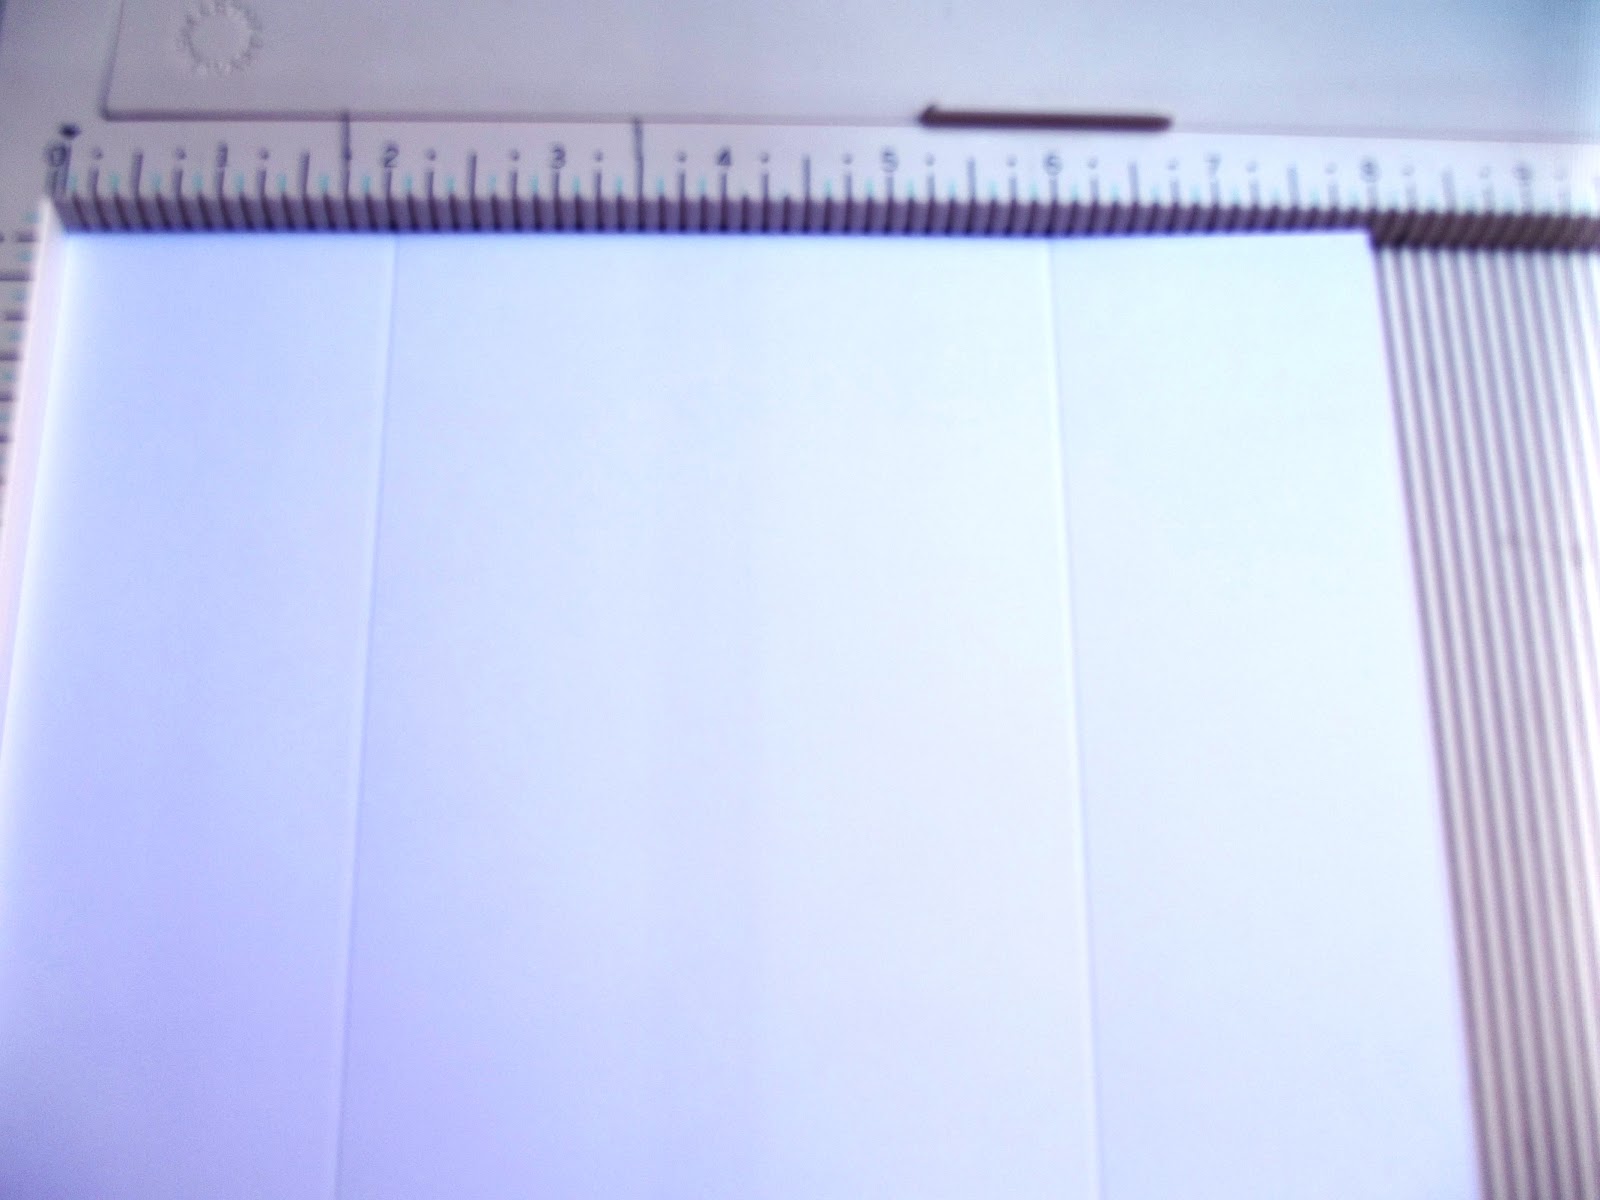
Cut a piece of card stock to 8" x 8".
Score at 2" and 6", turn and score the next side at 2" and 6".

It should now look like this.
 
Now cut the four corner squares off. Make sure you cut out a little bit more then you usually would so that the card folds in neatly.
This will mean that the cuts will join up a fraction into the central square but don't worry this will be covered up later on. :)
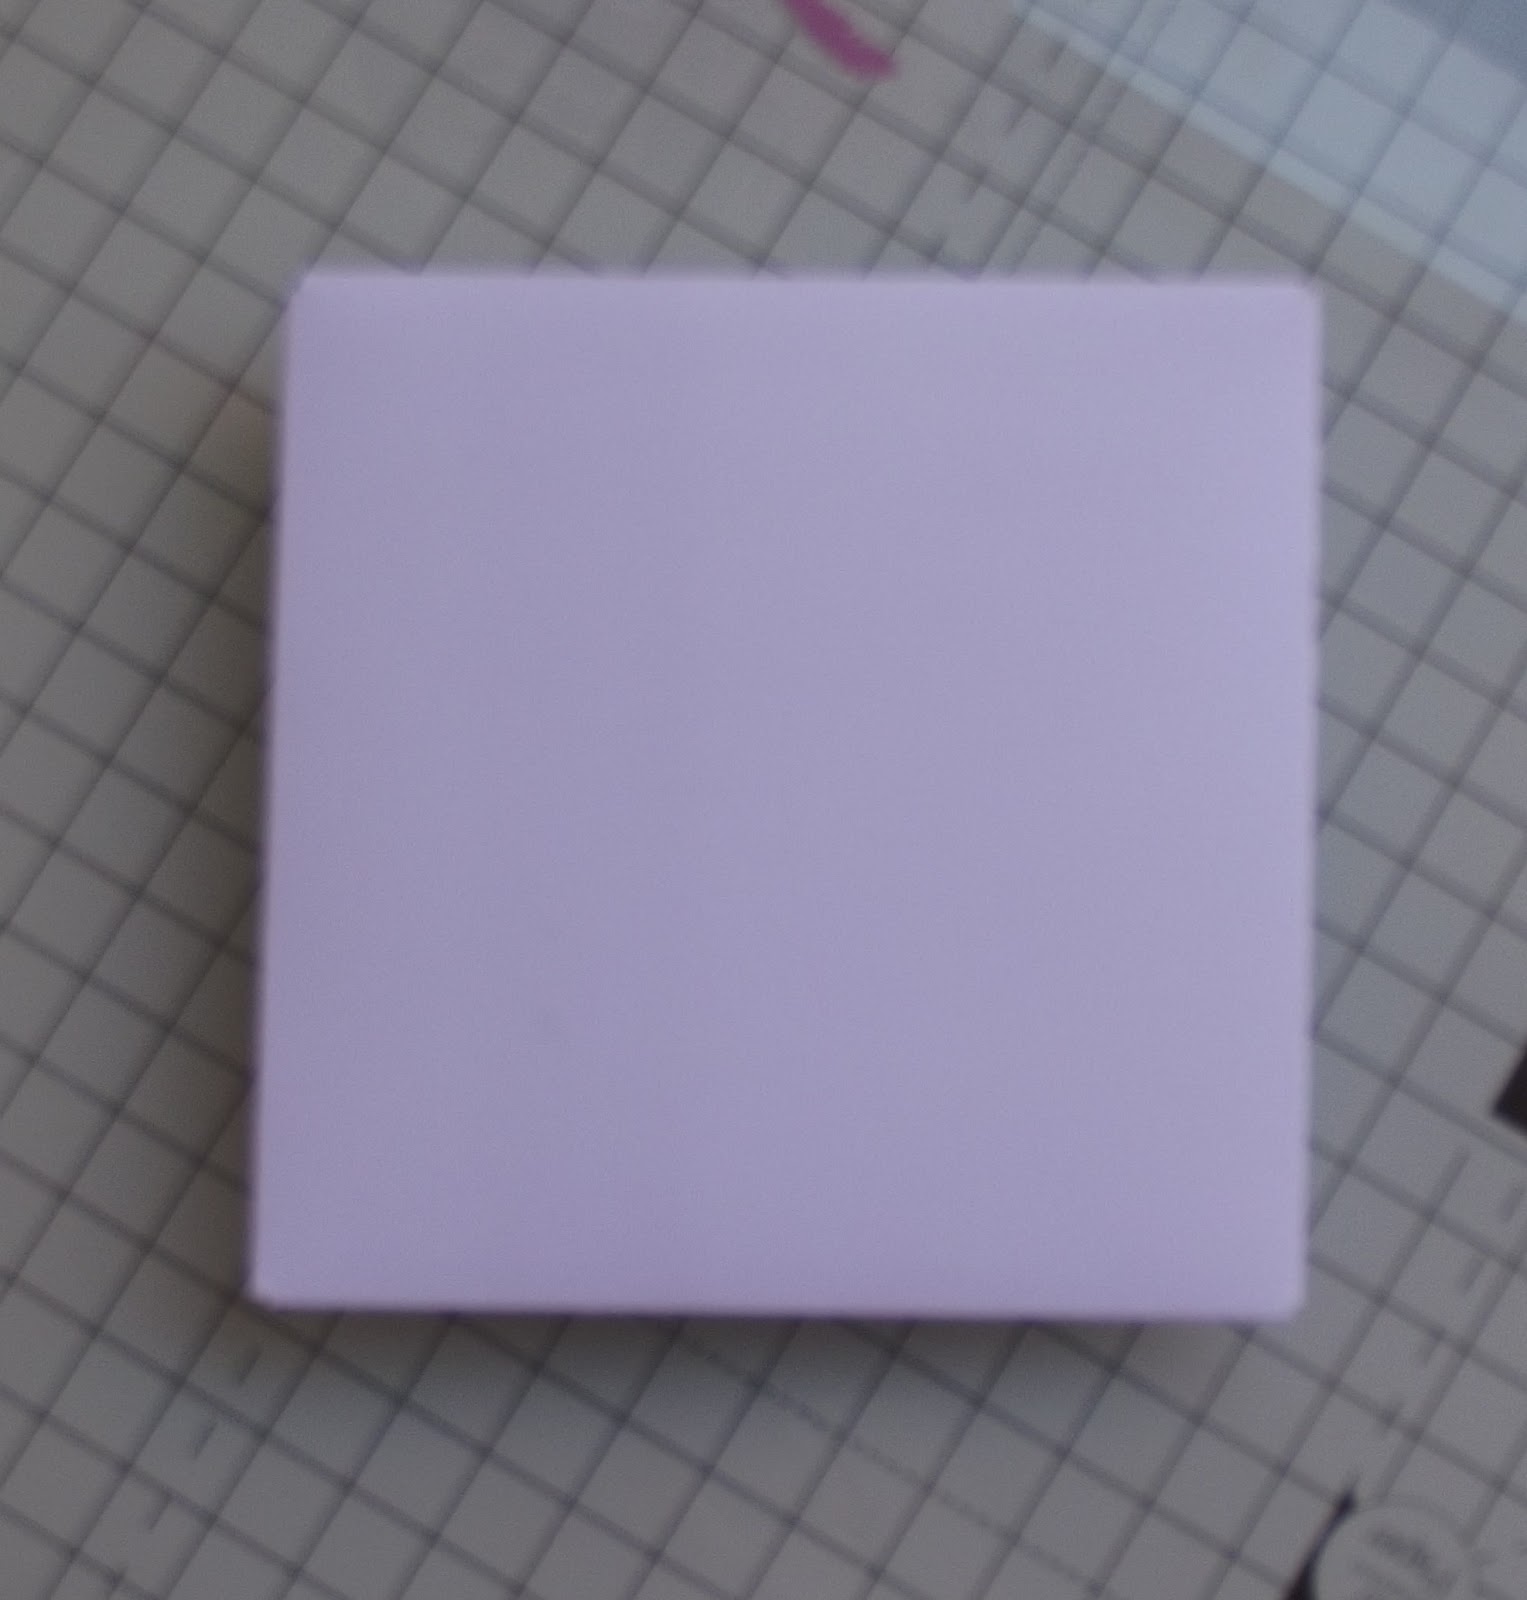
This is what you card will look like now.

Now take your corner punch and punch each corner.
Your card will now look like this :)
Follow the photos below to fold it all closed.


This is it closed up.
The photo below is not great but this is what it will look like on the other side. You will have little nicks showing at the corner but we will be placing a top onto this  and it will cover them up.

Cut a piece of card stock to the same size square as the card itself.
Emboss this piece of card on your Big Shot.

Place double sided tape on the back of the embossed piece and turn back the corners .
Join your embossed piece to the top of the card, when you are happy with your placement of the piece then press down on the exposed tape sections and slide out the tape cover pieces from the side of the card.
Now all you need to do is add a button and a tassel. If you have never made a tassle before there are a some great tutorials out on the web Make-a-Bookmark-Tassel is just one of them. Nice clear instructions. They use a needle on one of the steps and if I am honest I just wrapped my thread around a few times and knotted it and cut off any bits that looked a bit dodgy!!!! lol.

Remember this card can be made in loads of different sizes. All you really need is a square that can be worked into 3 sections. In other words a 12" x 12" piece of card gets scored at 3" and 9". What this essentially means is the center is twice the size of a side piece. In this case the left side piece will be 3" the middle will be 6" and the right side will be 3". For a 6" x 6" piece of card the left side piece will be 1½" the middle will be 3"and the right side will be 1½" . 

I hope you enjoy making this little gem of a card. I have to say I love it.

Happy Crafting Everyone.

Friday, August 10, 2012

Its mine.............all mine...mwah mwah mwah

Ok, so yes I am showing off, yes I am gloating, yes I am thrilled with myself. Yahoo, look at what is now living with me. My local shop The Premier Arts and Craft Store  in Bray are going to have trouble keeping these little beauties in stock because I may have to buy them all!!!!!!!!!!!!

 I got a wonderful Birthday gift yesterday from my friend Carmel. A voucher to spend in Premier Arts and Crafts...................oh happy days.  I promptly went down there this morning and spent it all (and extra!!!!)  on their fabulous new stock of Card Candi. I adore these little embellishments and of course I had to get stamps that worked with them..................well you would too!

There is a great little board up on the wall showing 4 different cards using the Candi and that was that I just had to have everything :) Minus about two packets which I fear I may have to purchase during the week. I sadly just want to open them all up and throw them in the air and have it rain Candi on me..............giggle............how fun would that be.

Well that's all my showing off for the night!!! I am off to have a play with them all now :)

Happy Crafting Everyone.

Tuesday, August 7, 2012

Reverse Fold Tutorial

Measure or just give it a go........................you decide!!!
 
 
To make this card: 
 
Cut card to 11” x 4 ½ “

Score down the short at 2 ¾ “ and 5 ½ “ (this means you will make your marks along the long piece of paper but will in fact be scoring down the shortest piece……it will make sense when you do it………..I promise!!!)

Fold in half at the 5 ½ “ fold.

Fold the 2 ¾ “ fold back on itself.

Decorate with papers, die cuts etc.

Wrap closed with a ribbon, trapping the ribbon under the front die cut, panel etc. Do not glue the ribbon at the back as you want this card to open into 3 panels.

Or to make it super easy!!!!!

Take any size piece of card.
Fold it in  half
Fold the front panel of the card in half backwards (towards the spine) 
Decorate and attach ribbon as described above.

Easy peasy lemon squeezy! Needless to say the second way is the one I use (giggle)

Happy Crafting Everyone :)

Sunday, August 5, 2012

Using Leftover Letters and Numbers

Just popping by quickly today to show you how I use up my leftover letters and numbers. I always have so many of those odd letters and numbers hanging around and ohhhhhhhhhhh I do not like having waste ........lol.

Using these leftovers as your background paper can make really effective "Back to School" or "Good Luck in your Exam" cards. This card is just a quickly made basic sample to give you and idea of what to do. From a simple basic card like this you can jazz it up with sponging, distressing, mixing tones and the list goes on!

So go on, dig into those old bits and pieces hanging around and use em up baby!

Happy Crafting Everyone  :)

Friday, August 3, 2012

Wellington Bear................Ahhhhhhh.

Sorry for my absence for a few of weeks. Summer has taken hold of the Larkin family and its hard to get the time to do anything these days. Hannah is starting secondary school in September so we have been running around trying to get everything organized which has been a bit manic!. I also promised myself that this Summer I would spend my days with Hannah and my nights working and you would be surprised how little I manage to get done!!!! lol.

Today's I thought I would show you 3 of my favorite cards from the Wellington Range that I demoed for the DoCrafts May June loop.

This first one looks just like a decoupage card but take a look at the second photo below. I have actually cut out the description photos off the packaging of a large decoupage card and made it up to have a teeny tiny card :) I adore this little card as not only is it cute but I started cutting it out to help me concentrate while I was thinking up other card ideas. When my crafting mojo goes on holiday I tend to cut out things and this little card sparked off about a dozen other ideas. I love it when a plan comes together :)
 
This card below is a favorite because its just simple matting and layering  with a hint of corner punch and I just think it has a totally striking look to it.

Last but not least for Fathers day. I have taken some mini canvases and inked them up with some dye based ink and popped some decoupage on top with some sayings. Cute little effect and a cheap and cheerful gift for a Daddy or Granddad.


Happy Crafting everyone :)