Showing posts with label Boofle. Show all posts

Wednesday, May 30, 2012

Super Easy Tissue Holder Tutorial


Cut a piece of cardstock A4 height by the width of your tissues
Score down the shortest part of the card at: 1”, 2”, 4”, 5” and 7”
Fold all scores inward and strengthen folds with a bone folder.
Now place your tissues inside just to check they fit. I have used anything from 4 to 6 tissues as it depends on the brand that you buy.
 

Once you are happy with the fit of the tissues decorate all the panels that will be seen in patterned paper.. When you have done this wrap your cardstock around the tissues again just to ensure you know where to cut the hole for the tissues (sounds basic, but its not very funny when the hole ends up at the bottom.....lol)

Cut the hole with  your Big Shot or draw a rectangle by hand on the back of the panel you are cutting into and cut this out with a craft knife.

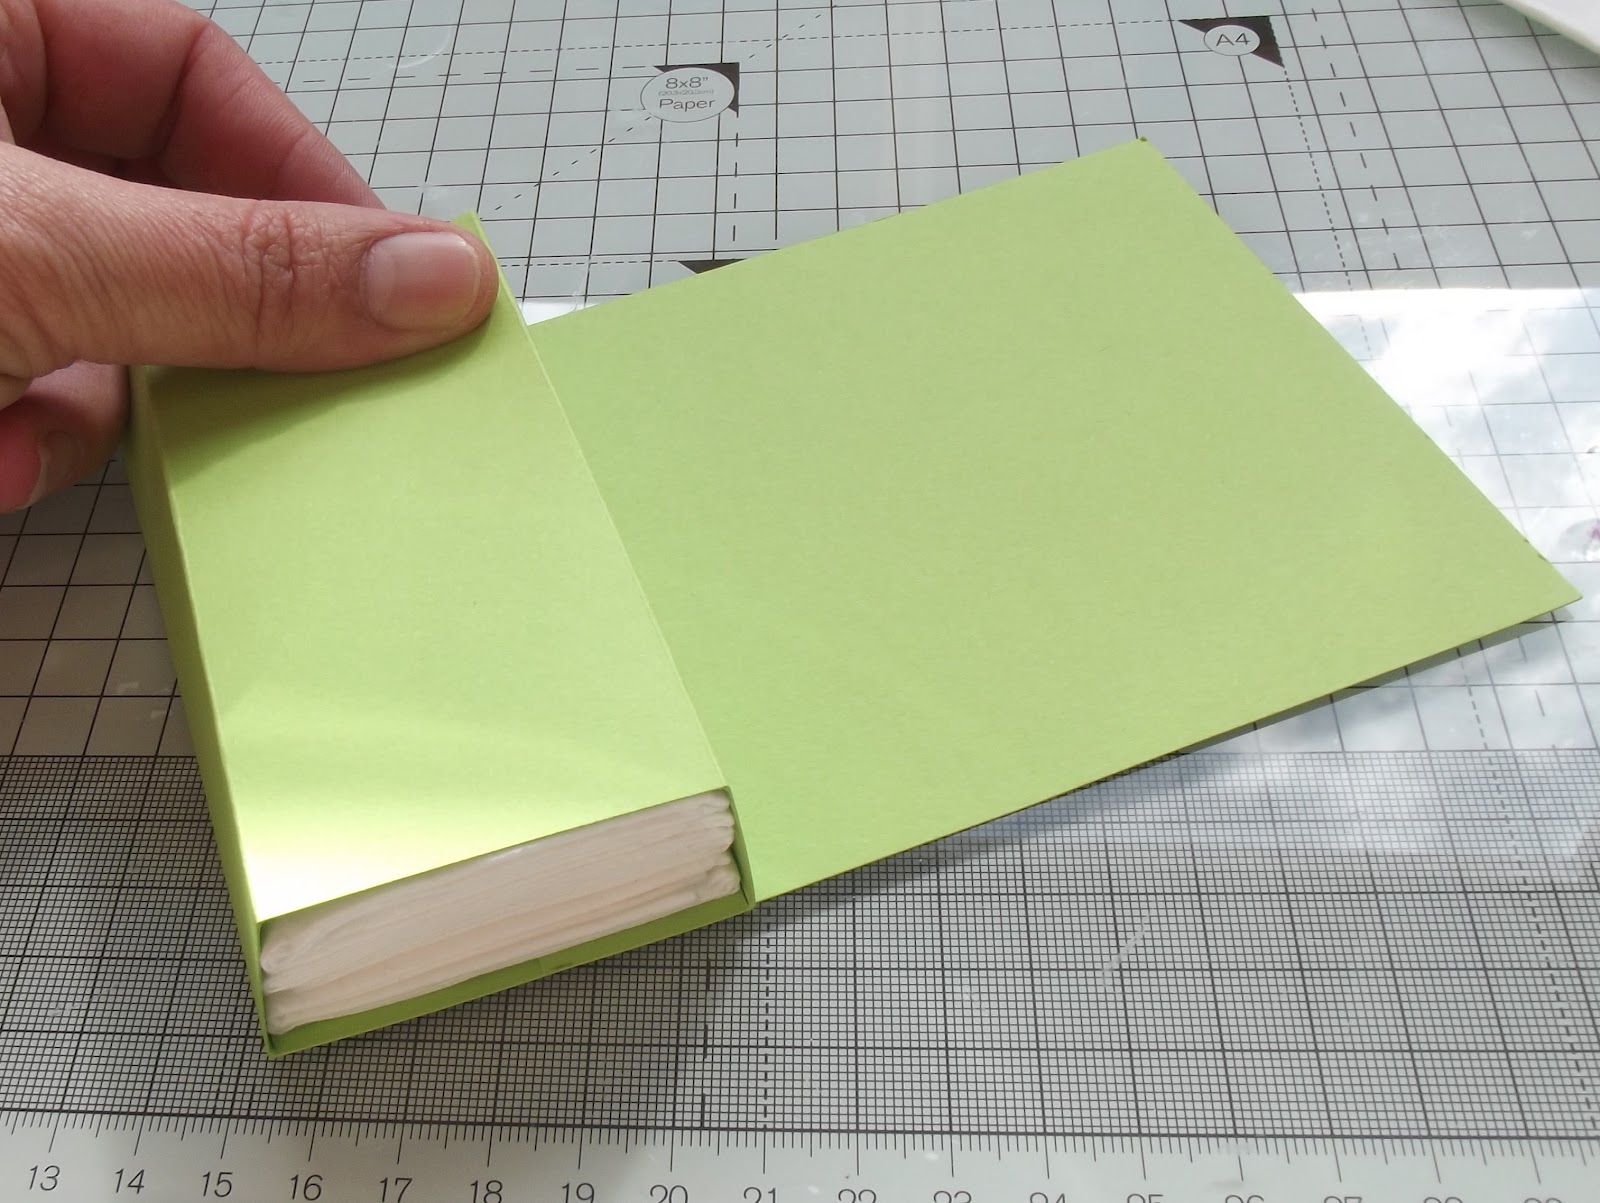
Place double sided tape on the first two 1" panels. Place the tissues on your project and wrap the cardstock around them. (as shown in the image above minus the decoration) Join the panels together. 

Finish decoration and you are done.
Hope you give this little holder a try as its really fun and quick to make :)

Happy Crafting Everyone.

Friday, May 18, 2012

Boofle Birthday

Using the fab Boofle papers I took a piece of left over scrap from another project and cut it into equal sized strips (to make it stretch further!!!) Topped off with a bit of decoupage and a spare flower from another project and a great little card is born. I have to say this card was really popular at the demos as it was so simple and so pretty. 

Happy Crafting everyone......

Monday, May 7, 2012

Create your own Background paper (1)

I adore this card. I was inspired by a card in "Papercraft" magazine in a section called "Color My World" and I fell in love with the idea. The paper is from the Boofle Paper Stack. I just took my craft knife and cut wavy lines along the paper so that I ended up with loads of strips of wavy card. I used 3 colors for this sample but I have also made cards with just loads of colors that I had left over from sheets of plain card that I had used for other projects (see second sample below).

Next I folded over a sheet of A4 card to make the A5 Card I was going to use as my base.

I then cut a piece of white card and cut it smaller then the A5 card so that it would sit nicely on the front of the card leaving a lovely white border around it. Cover this piece of card from top to bottom in Double sided tape. Removing the tapebacking and then lay the wavy paper pieces from the bottom upwards. I let the first piece hang over the bottom of the card and then continue to layer all the way up to the top of this card section. At this point the pieces fall over the sides of the card. This gives me the opportunity to play around with the lengths of wavy paper so that they all end up looking random and I get to choose the nicest cuts (waves) I have made. I just hold them above the card and move them from left to right and right to left until I like how it looks and then I place it on the double sided tape.

Once I have finished laying down all the pieces. I flip the piece of card over and cut off all the bits hanging over the edge so that it ends up as a nice straight edged piece. Pop 3D foam on the back and place onto your A5 card. Now just embellish with your greeting, decoupage etc.


Thursday, May 3, 2012

Missing You!

Ok, so you have to admit that this is the cutest image EVER.............. When I got my demo kit at the beginning of the last loop this was the first image I HAD to work with. I love love love it. I straight away though of my best friend Tara as she is living in Wexford and I miss her all the time. We talk on the phone and skype and I know she is always there if I need her but some days I just want to sit down just like this little chap and pretend she is just living next door and I can just go in for a chat :)

Hope you like it Taz.

Happy Crafting everyone :)


Sunday, March 18, 2012

Chocolate Flower Vase

Happy Mothers Day everyone. Don't worry if you don't have kids, just look around your crafty stuff and accept that its your baby :). I am spending today with  my real live baby and tonight with my Flexmarker babies......lol.

This is a project I saw about two years ago on the internet, I made it for my mom and showed it around in demo and I decided to do it again this year because its just such a fab project. The vase is made with 3 bars of chocolate. The flowers and vase wrap are all made from the amazing fantastic adorable Boofle 12 x 12 Paper stack  (can you tell I like it!!!!!). The buttons and decoupage are also from the Boofle range. Is it sad that I have bought 3 packs of the buttons so far!!!!  This project is fantastic for Mothers Day, Birthdays, Get well soon, it just works for most occasions :)

Hope you all have a great day. Happy Crafting everyone.