

Ok its after 9pm here, X Factor is over (my guilty pleasure), Hannah is in bed, Gary tucked up on the couch watching football and your should all be ready to do some cardmaking!!
I had hoped to get this tutorial up on line yesterday but after a fantastic demo in Carlow I came home and was in bed by 8.30pm...........such a sad situation, I was wrecked (LOL). Well I am back on form today so here comes the Star Card Tutorial. I saw a sample of this card on line and searched for hours to find out how to make it. Finally many many cups of coffee later I FOUND IT!!! Yipee.............. Then I LOST IT.......grrrrrrrrr. I can't find it in my computer history and I really really wanted to give credit to the creator of this card because they are just genius to have worked this out. I salute you mystery Star Card creator :)
I have done my own tutorial for it in the meantime because it is just such a fab card and if you follow the measurements and pictures you will be shocked at how easy it is. I have made the cards that are shown here as Christmas Cards but to be honest I think this would be excellent as a Birthday card, passed your exams card etc etc.....the list goes on. Fantastic.
(all measurements are in cm)
Trim a piece of 12 x 12 cardstock to 30cm X 30cm
Make a mark on the top of the page at 15cm and from this mark draw a line part way down the middle of the page This is just a guide line and I like to work off it. Do this the first time you make the card as its easy just to follow what I do here and when you make your next one you can do what works best for you.

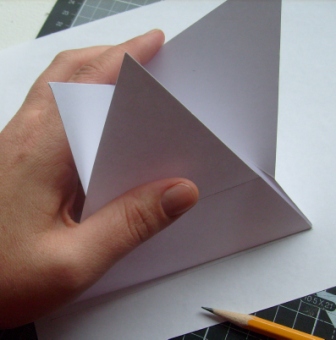
Working with your ruler from your top mark make a mark 4cm down this central line. From this 4cm mark draw a line to the bottom left hand corner and then draw a line from the 4cm mark to the bottom right hand corner. You will have drawn a Triangle.

Now cut out the Triangle you have drawn. When you cut out the triangle make sure you cut all of the pencil marks off, this helps further on in the card when you are tucking it all together as it will fit a lot neater. You can erase your central guide line now if you like as it has served its purpose :) You can see in my picture I am lazy and did it later!!

Put your ruler up against the bottom of the triangle, it is 30cm long (as are the other 2 sides). Mark 15cm (the center) on each side of your Triangle

.


Working from your inner triangle points, Place your ruler with the point of the triangle at the 15cm ruler line and make a mark 5cm either side of this ( 10cm and 20cm) . Do this from all three inner triangle points.


Draw a line between these marks as shown in the photos.

Score all 6 lines that you have drawn.

Rub out your pencil marks now.
Fold all the inside lines inwards and all the outer folds backwards.


Tuck the folds into one another as shown and then use a bone folder to strengthen the folds. After a bit of playing around with this (and after I took the photos!) I found an easier way for me to fold the card together, so here it goes....When I fold the card I think of it like this. I have the card facing me with a panel on the left a panel at the top and a panel at the right. Working from my left panel it goes down first, then next goes down over it and then the third and final panel goes down over that. Then I tuck the the crossed over panel at the bottom. Grab the bottom left point (it will be tucked under the right point gently pull it up and tuck the right point under it. (Under, over over tuck.). This will put you into a bit of a panic the first time but you will get a lot better at it and you will soon realize that the card wont rip. Yep the photos show me doing it starting from the right and I did tuck it this way for this card but as I am know to say........".do what I say not what I do" (or sometimes photograph!!!!)


Now to start the decoration.
Cut 6 strips of patterned paper to 15cm x 4cm. You will end up playing around with this measurement yourself to get the look you want.
Place one of these up against one of the bands on the card, draw the edges and cut these off.


After you have cut your 6 pieces make a mark 1cm in from the top and bottom right hand corner and cut this section off. These pieces should now fit in neatly to the bands on the card with a nice boarder. If you like a slightly smaller boarder just cut 1/2cm off the bands.


When I first made the card I made templates of all pieces that I needed, you always have to have a bit of a play with these pieces and when you get it right and you are happy that they fit well then those pieces become your templates and it takes all the measuring hassle out of making the card in future.
Draw around the triangle at the tip of your card onto the back of your patterned paper as shown. When you cut, cut inside the lines as you want this triangle to fit in neatly or with a small boarder, I always find I have to have a bit of a play with this until I am happy. Once you have it the size you want. Copy this onto the back of your patterned paper another 5 times and cut these out also.


Now measure your center triangle of the card, I place the star on the back of my paper and holding the points up or folding them into the center I just draw around the base triangle and cut it out. Now cut it down slightly to get it to fit nicely into the center of the card leaving a small boarder.
For my center of this card I cut out a triangle of light white card and used the spare paper pieces left over from cutting my other triangles etc, I cut them square and covered the white triangle with glue stick, then I patch-worked these pieces onto the triangle piece I had cut. Flipped it over and cut off the excess. No waste..........happy days.

Now start attaching all your pieces. I use double sided tape to do this as this is a real pull at card and I want to ensure everything stays on solidly.


Tuck star back into place again and ensure all fits nicely. Now open up again and decorate with embellishments,


Done and dusted. Give yourself a pat on the back......you know you deserve it. :).
Well its off to the shops for me. I have yet to buy food for the week! When I come back I expect you all to have made your cards. hehehe.........
love it might try one tomorrow
ReplyDeleteLove it, I always try to make a special Christmas card for my extended family, I think this year I'll try this one.
ReplyDeleteThanks for the tutorial!
wow thank you ... super card and super tutorial it must have taken you a while ... happy crafting and love sandy xx
ReplyDeleteLovely card, I saw it in Athlone and loved it.. I wrote down the instructions but couldn't follow them when I got home! I'm delighted to see the tutorial on your blog, thank you. Keep up the good work Cliona.
ReplyDeleteBeautiful card ! thank you for the tutorial. I try to make the same. This is the link you to see my cards in my blog. http://papelicos.over-blog.com/article-carte-etoile-105341224.html
ReplyDeleteKisses.
Thank you for the fantastic tutorial! Great set of cards.
ReplyDeleteGee this looks beautiful but so complicated. Thank you for taking the time to post the tutorial. I am anxious to try it:) Hugs
ReplyDeleteThanks for a great tutorial.So easy to follow.Made my first star card and it turned out perfect.Hope you don't mind but I've added a link back to here from my blog.
ReplyDeleteLisa x
Thank you for such a wonderful tutorial!! I can't wait to make this card :) Cheers Jennie
ReplyDeleteWhat a lovely tutorial - I totally have to try this out :o)
ReplyDeleteHugz
Ea